As part of my Sopra Steria engagement, I have been lately fortunate to spend time in the so-called Aerospace Valley, which is a cluster of aerospace engineering research centers in Toulouse, France. My recent task was to do with cloud detection (image recognition). The goal is to train neural network to detect whether a satellite image is obstructed by clouds.
My work is based on this open source code by Maurício Cordeiro, which the author describes as very simple U-Net model with PyTorch for semantic segmentation of satellite images. PyTorch is deep learning library, and U-Net is a type of convolutional neural network, originally from University of Freiburg.
The network works on sizeable test and train set that contains about 80,000 labelled tif (raster) images, totalling at 15 GB, published together with papers quoted here by S. Mohajerani and T. A. Krammer and P. Saeedi.
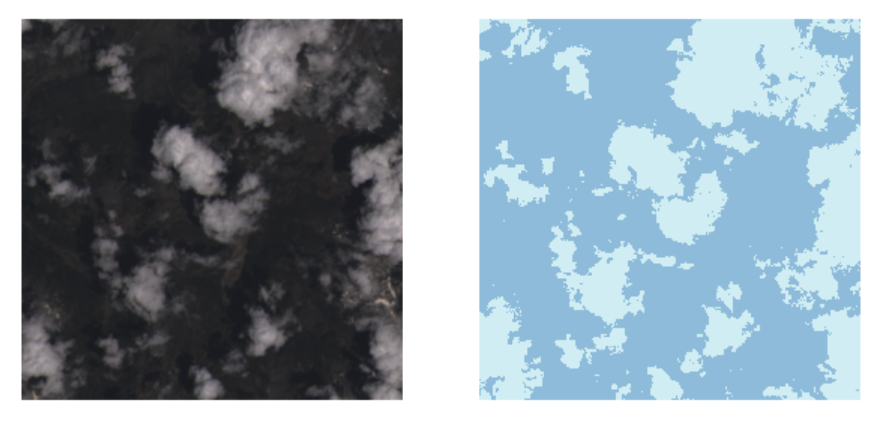
The expected functionality is demonstrated below. Given the input satellite image (left), the network is expected to do the segmentation, producing the binary mask indicating the clouded areas (right).
For the reasons of performance and scalability we needed to port the code to the Amazon AWS cloud. Part of the reason is that GPU processing (that uses Pytorch and CUDA) easily available on that environment.
The task is not difficult, but still took a few days due to some glitches. Here are a few notes.
1. Pushing data to S3
Not trivial. I decribed this in this separate article.
2. Displaying tif images
During development on AWS you will often need to view images, in order to verify if the processing makes sense. If your environment is in the cloud (for instance Sagemaker), accessible by the browser, the standard way may not work because it attempts to call an external viewer on your computer:
from PIL import Image
im = Image.open('sample_clouds.TIF')
im.show()
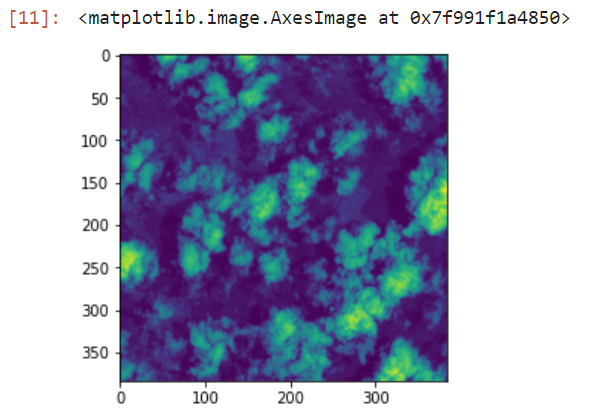
Instead, you can view PIL images with pyplot:
import matplotlib.pyplot as plt
im = Image.open('sample_clouds.TIF')
plt.imshow(im)
expected output:
3. Accessing tif images located in S3
It is easy to download a file from S3 and store it locally:
object = bucket.Object(remote_filename)
object.download_file(local_filename)
However, this local copy is unnecessary. It would be better to upload images directly to the memory. To do this, we need to do the following trick using o.BytesIO(), because of the binary nature of the content of a tif image:
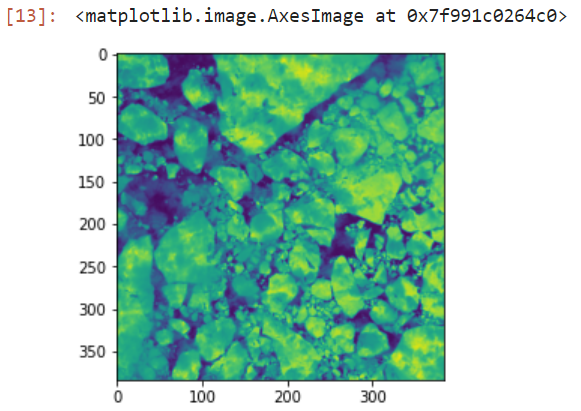
import io
bucket = s3.Bucket(s3BucketName)
filename='data/38-Cloud_test/test_blue/blue_patch_269_12_by_5_LC08_L1TP_018008_20160520_20170324_01_T1.TIF'
obj = bucket.Object(filename)
file_stream = io.BytesIO()
obj.download_fileobj(file_stream)
im = Image.open(file_stream)
plt.imshow(im)
Here is an alternative ending, using response object. The result is the same.
response = obj.get()
file_stream = response['Body']
im = Image.open(file_stream)
More details on this are provided in this nice thread. Also, as you may note the original notebook needs to correctly parse the contents of the folders that contain tif images. It uses the native Python abstraction pathlib.Path representing POSIX path, so a folder can be listed like this
file_names = [f for f in r_dir.iterdir() if not f.is_dir()]
In S3 this is impossible due to flat storage model, hence we need to modify this code. First we need to list all keys (filenames) in a bucket and then parse the list to find the content of our folder:
from pathlib import Path
bucket = s3.Bucket(s3BucketName)
all_files = bucket.objects.all()
bucket_contents = [obj.key for obj in bucket.objects.all()]
file_names=[Path(f) for f in bucket_contents if f.startswith(folder_name) & f.endswith("TIF")]
Note1: that I finally convert to Path, eventhough I don’t have to, however this makes my new code compliant with the original class that uses this abstraction. Note 2: finding all files in a bucket is expensive, so once the variable bucket_contents has been created, it is worth to store it for later or even serialize it and store on disk, because we will need to reuse it.
4. Enabling/disabling GPU processing
Your cloud environment may or may not have access to GPU processing. Torch uses CUDA library which enables the GPU. The original code has been written with the assumption that the environment has that. The calculations make use of cuda, and will fail in an environment that is not CUDA-enabled (without GPU) due code snippets like this, enforcing the CUDA transformations of data structures:
return (predb.argmax(dim=1) == yb.cuda()).float().mean()
Luckily, torch can run without GPU and CUDA, only that it will be slower but it will run. To ensure code portability, the code can be rewritten with alternative, CUDA-disabled version. The above snippet could be rewritten as follows, to run on any environment regardless whether GPU/CUDA is or is not present:
if torch.cuda.is_available():
    return (predb.argmax(dim=1) == yb.cuda()).float().mean()
else:
    return (predb.argmax(dim=1) == yb).float().mean()
5. Training the model
The entire point of GPU processing is to shorten the model training time. As an example, my laptop (CPU) needed 4 hours to complete the training of a model on 600 images with 10 epochs. In contrast, on a GPU-enabled Amazon EC2 instance, the same time was sufficient to train on 8,000 images, achieving much better predictive accuracy.
Still, this is 4 hours, which means that Jupyter Lab is not an optimal environment. You would need the browser window constantly open and active. In my experience, instability of network connection, or even laptop going to sleep is likely to cause the session to break and kill the process. For this, the process should be executed in batch environment, such as Airflow, Sagemaker pipeline, or Apache Spark. But as our workflow is simple, an old fashioned solution will work equally well: a python script executed by cron or nohup.
6. Loading the same model on GPU and CPU
Sometimes the model has been trained on GPU and saved, and we then want to run it on CPU environment. Pytorch enables this. It provides 2 ways of storing the model. One way stores the entire model (then you cannot use it between environments, because it contains direct calls to GPU device). The other way is a bit more complex and it involves loading just the model parameters (state_dict), and then recreating the model on a new environment. Then you can use the same model on both environments.
However, when I tried to deserialize a GPU-created model onto a CPU environment, as proposed in the online resources:
unet.load_state_dict(torch.load(f'{model_folder}/{filename}'), map_location=torch.device('cpu'))
I hit this error, which, contrarily to the message, would not disaappear if I mapped the CPU device:
RuntimeError: Attempting to deserialize object on a CUDA device but torch.cuda.is_available() is False. If you are running on a CPU-only machine, please use torch.load with map_location=torch.device('cpu') to map your storages to the CPU.
Solutions from this stackoverflow thread or this one also did not help. Creating a custom CPU picker, as proposed in the tread, yielded another error:
UnpicklingError: A load persistent id instruction was encountered,
but no persistent_load function was specified.
In the end I found the following sequence worked. Admittedly it does not look clean, the loading code somehow twice. But it was the only combination that worked for me, to load a GPU-created torch model onto a CPU-based environment. Note that I am first loading the entire model, and in the second step only extracting its state dict to create a new model based on that.
model_gpu_name='model-gpu.pth'
mydict=torch.load(f'{model_folder}/{model_gpu_name}', map_location=torch.device('cpu'))
model_gpu = UNET(4,2)
model_gpu.load_state_dict(mydict)
model_gpu.eval()
7. Running the model
After those modifications the notebook became fully functional, and the model trained successfully on AWS using the S3 data and GPU or CPU processing power. I then made a few simple experiments to prove that what the model does, makes sense. I trained three models A, B and C each time increasing the number of training images, ranking from 100 to 8,000. So I would expect that the model C will return the most accurate predictions. Is this the case?
For the purpose of manual sanity check, I created manually two control sets (consisting of images that the model has not seen).
The first set contained images where I thought the task of cloud detection would be easy for a human. An example is below, far left. Second from left is the ground truth: a binary mask telling us the actual cloud coverage. Predictions from the models A, B and C follow. As can be seen, the sanity test passed: the predictions generally make sense, and indeed the precision accuracy increases with the training time.

The second set contained “difficult” images like the snowy mountain formation below. As can be seen, the models A and B are indeed quite confused, yielding bad predictions, while the model C improves.

Here is another example of a tricky image (even for a human). The mountain, itself hardly visible, is half-submerged in clouds. The predictions are far from perfect, but they make sense so the sanity test pass.

The above does not pretend for any data science – this is merely a sanity check proving that the model, trained on a new environment, behaves as expected and yields results that make some logical sense. The actual data science has not started yet. The subsequent work of me and my colleagues is to do with the model tuning, network reduction through quantization and pruning, and explicability (Explainable Artificial Intelligence, XAI, saliency maps).
Credits: again, the credits should go to the original authors: Mauricio Cordeiro (code), S. Mohajerani and T. A. Krammer and P. Saeedi (data) as well as Julie Vierge, Sopra Steria who started this work and introduced me to the topic. Thank you. This is part of my work for Sopra Steria.